Thursday 20 December 2012

Fix for Citrix XenApp Published Apps Disabling Windows Visual Effects

A lot of time One of the minor issues I have encountered is that the Connection Center component of the Citrix Plugin client disables some of the visual effects at log on in Windows including the “Animate Window Minimizing and Maximizing” setting.  I have also noticed that the “Show Windows Contents While Dragging” setting also sometimes gets deactivated.  Having these disabled if you are using the Aero interface is particularly unattractive. 
To stop these from turning off it is necessary to prevent the Connection Center process “concentr.exe” from running when the user logs on.   Keep in mind that disabling the Connection Center will prevent you from accessing the features available in it.  This fix will only affect programs and windows running locally on the computer, apps published from XenApp will still have the visual features disabled.  On my computer the user I normally use is a standard user, so I will disable the execute privileges for the local Users group for the “concentr.exe” file.
I have found that this is the only way to disable the Connection Center from running without the Plugin (in particular the Web version) from detecting that something has been changed and rerunning the initialization.  Renaming the “concentr.exe” file or disabling from running within “msconfig” didn’t work for me.
First navigate to “C:\Program Files (32-bit) or Program Files (x86) (64-bit)\Citrix\ICA Client”.
Right click “concentr.exe” and choose Properties.

The screen shots show me modifying a different file because I’ve already run through the process on “concentr.exe”, but everything should be the same in the pictures except the file name.  Click the Security tab, then click Advanced.
Click Change Permissions, UAC may prompt you depending on your user log on.
Uncheck the “Include inheritable permissions” check box.
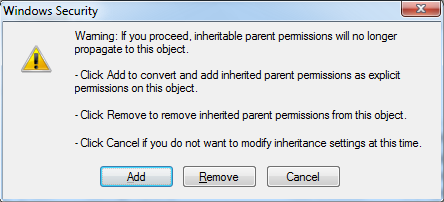
Click Add to copy the inherited permissions.  Now click OK on the dialog boxes until you are back to the main file properties dialog shown below.
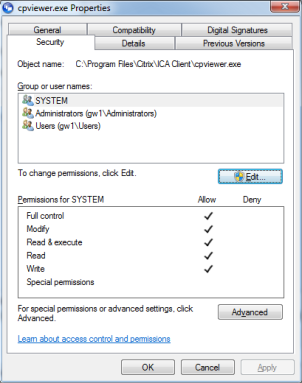
Now click Edit.
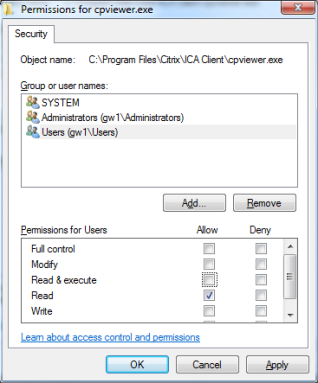
Highlight the Users group, then uncheck the allow Read & Execute permission.  Now click OK until you’ve closed all the dialogs.
Now to make sure that the visual effects are enable, go to Start > right Click Computer, then choose Properties.
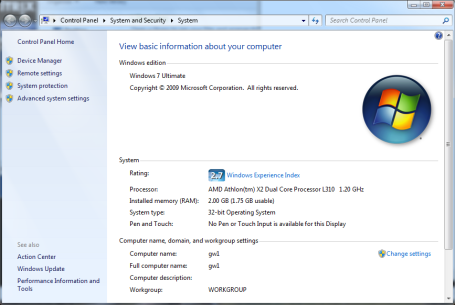
Click Advanced system settings.
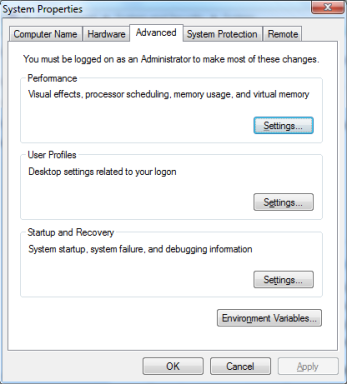
In the Performance section click Settings.
Select Adjust for best appearance, then click Apply.  You may need to adjust to a different set of settings in order to ensure that the settings are applied.  Now close out of the windows.
I have noticed on occasion that the “Show window contents while dragging” may sometimes disable itself even with this fix applied.  Sometimes this may be related to disconnecting and later reconnecting to a XenApp session, however this doesn’t happen consistently.  I’ll let you know if I come across anything to permenantly fix this.

Thursday 1 November 2012

Enable or Disable Hibernate

Enable or Disable Hibernate Through Command Prompt
Using the Command Prompt might be the easiest way to enable or disable Hibernation. Click on Start and type CMD into the search box and it will be listed under programs. Right-click on the icon and select Run as administrator.
6hi
The Command Prompt opens and you will use the following to enable Hibernation.
powercfg /hibernate on

Type in the following to disable hibernation.
powercfg /hibernate off


Disable Hibernate Through Regedit
Note: Changing registry values can cause your computer to become unstable or stop functioning and is only recommended for experienced users.
Now that the disclaimer is out of the way…you might want to completely disable Hibernate mode through a registry edit. Open the Registry and browse to HKEY_LOCAL_MACHINE \ SYSTEM \ CurrentControlSet \ Control \ Power and change both HiberFileSizePercent and HibernateEnabled value data to zero. After you’ve made the changes close out of the Registry Editor and restart the machine.


Friday 14 September 2012

Applying a default host profiles in vSphere 5.1 cluster fails

I was playing around with host profiles in my vSphere 5.1 home lab today. It was easy enough to create a baseline by selecting a given host in a cluster. But, without having changed anything, when I tried to check for compliance I received the following error:

"A general system error occurred: Failed to run Execute operation on esxi-hostname.domain.net: IP address '192.168.1.x' is used for multiple virtual NICs"


I was pretty sure that I had only used that IP address for the service console, or the management interface, for one host.

To fix it, it is necessary to modify the profile as it is trying to apply the same IP address to the vmk0 (the management interface) of the other host(s) in the cluster.

Go to Network configuration -> Host virtual NIC -> dvSwitch ->IP address settings ->IPv4 address (assuming you are using a dvSwitch for vmk0) and change the option to:

'User specified IPv4 address to be used while applying the configuration', see screenshot below.

Then update the answer file for each host and rerun the compliance check.

Improved vMotion in vSphere 5.1 - data moving vMotion

I heard about the new and improved data moving vMotion in the VMworld keynote and wanted to try it out in the home lab. The improvement consists of vSphere being able to perform a simultaneous vMotion+svMotion so you can change both datastore and host at the same time.

I was expecting this feature to be available from the vSphere client by right clicking the VM and choosing 'migrate'. However, this is not the case. The option is there but it is greyed out stating that the VM has to be powered off to perform this action, see screenshot below:


From the vSphere web client the option is available by right-clicking the VM and choosing 'Migrate', see below.


One apparent limitation is that you cannot migrate between Datacenters, only between cluster within a given Datacenter.

Other than that, the feature works as expected. I did a vMotion plus datastore move from local storage to shared storage. This is one of the feature that I've found that is only available in the vSphere web client and not in the vSphere client which leads one to assume that VMware is actually serious about moving future administration away from the vSphere client.


Thursday 13 September 2012

Enabling 64-bit VMs on nested ESXi 5.1

In my home lab, I have a 2-node cluster with two virtual ESXi 5.1. When I tried to boot a 64-bit on these hosts I received the following error:

"Longmode is unsupported. It is required for 64-bit guest OS support. On Intel systems, longmode requires VT-x to be enabled in the BIOS. On nested virtual ESX hosts, longmode requires the "Virtualized Hardware Virtualization" flag to be enabled on the outer VM."

I seem to remember that in version 5.0 you had to configure a given parameter in the ESXi console. For ESXi 5.1 this has changed according to this VMware KB.

It states the following:

"Virtualized HV is fully  supported for virtual hardware version 9 VMs on hosts that support  Intel VT-x and EPT or AMD-V and RVI. To enable virtualized HV, use the web client and navigate to the processor settings screen. Check the  box next to  "Expose hardware-assisted virtualization to the guest operating system."  This setting is not available under the traditional C# client."

So, access the web client, locate the VM, right click -> Edit settings, and check the box as mentioned (for the parent VM, not the virtual ESXi...). It works like a charm, see screendump below:


Tuesday 11 September 2012

vSphere web client - failed to connect to VMware lookup service

Yesterday, I installed the vCenter 5.1 vCenter Virtual Appliance in my home lab. It went fairly smooth, however, I couldn't connect to the vSphere web client. I received the following error:

Failed to connect to VMware Lookup Service - https://localhost:7444/lookupservice/sdk

I found a VMware KB indicating that there could be something wrong with the SSL certificate - because I had changed the FQDN of the appliance after initial setup.

That seemed a little overkill as the appliance should work or at least you should be able to reconfigure it.

The solution was to log into the administration web interface, https://vcenter-server-name:5480, and re-run the  configuration wizard with default settings. That fixed the problem and it didn't delete the cluster and folder settings that I had already configured for this given vCenter server. The vSphere web client can be reached at the following address: https://vcenter-server-name:9443/vsphere-client/#

Btw: the deafult login for the vCenter 5.1 virtual appliance is user: root and password: vmware

Wednesday 5 September 2012

Activating and using VMware PSO credits

For the second time, in my company, we've negotiated a rather large ELA agreement with VMware (ultimately via a reseller) which includes buying a bunch of new licenses and then renewing SnS for the existing ones. With this ELA, there are quite a lot of PSO (Professional Services Organisation) credits that come with the agreement. First time it took us a while to figure out what to use them for, and now the second time it still creates confusion in regards to activating and using them.
After entering into the ELA, we received an activation email to an email address that we had specified (we had just told it to the VMware sales guys). Once the credits were activated, we received a confirmation email that they were indeed activated.
From here on, it is possible to buy different products and services with the credits.
To use the PSO credits, log in to:
Use the email address that the license activation mail was sent to. If there's no account associated with this email address, then create one.
Once logged in, you can add multiple users so that they can log in with their own account and book training courses on their own: Home -> Services -> VMware Training -> myPaymentAccounts -> Edit (or go to My account -> myPaymentAccounts). Here you can also see how many points you have available and what you have used your points for.
From the mylearn site it's fairly easy to browse for course training and then paying with the credits. But the credits can also be used for other things such as paying for your VMworld ticket, for consulting services (PSO), and to pay for the VCP exam.
To pay for the VCP exam you need to retrieve a voucher first on the mylearn portal: Home -> Services -> VMware Training -> VMware Consulting and Training Credits -> Continue. Or go directly to this link. Going through this process will generate a voucher code which costs some credits. When you book the exam at Pearson VUE (requires a seperate account) you can use your voucher code to pay for the exam.

Monday 30 July 2012

How to block flash videos using Squid proxy Server

One popular example is to block flash video, used by sites such as Youtube.
The MIME type for such content is "video/x-flv". Creating an ACL to block this is easy.

First, create an ACL which matches the MIME type in question:
acl deny_rep_mime_flashvideo rep_mime_type video/x-flv
Then create a HTTP Reply ACL which denies any replies with that MIME type:
http_reply_access deny deny_rep_mime_flashvideo
This has been verified to block Youtube flash video content.

If the content is blocked the following similar line will be seen in access.log:

1282485682.146    903 127.0.0.1 TCP_DENIED_REPLY/403 3143 GET http://tc.v15.cache3.c.youtube.com/videoplayback? - DIRECT/208.117.252.163 text/html


And on browser, you can see ...


Sunday 29 July 2012

HowTo Allow windows updates through squid

Add the following to your squid.conf, It 'MUST' be added near the top before any ACL that require authentication.

acl windowsupdate dstdomain windowsupdate.microsoft.com
acl windowsupdate dstdomain .update.microsoft.com
acl windowsupdate dstdomain download.windowsupdate.com
acl windowsupdate dstdomain redir.metaservices.microsoft.com
acl windowsupdate dstdomain images.metaservices.microsoft.com
acl windowsupdate dstdomain c.microsoft.com
acl windowsupdate dstdomain www.download.windowsupdate.com
acl windowsupdate dstdomain wustat.windows.com
acl windowsupdate dstdomain crl.microsoft.com

acl CONNECT method CONNECT
acl wuCONNECT dstdomain www.update.microsoft.com

http_access allow CONNECT wuCONNECT localnet
http_access allow windowsupdate localnet

The above config is also useful for other automatic update sites such as Anti-Virus vendors, just add their domains to the acl.

Saturday 28 July 2012

Block mp3, mpg, mpeg, exe files using Squid proxy server

First open squid.conf file /etc/squid/squid.conf:
# vi /etc/squid/squid.conf

Now add following lines to your squid ACL section:
acl blockfiles urlpath_regex “/etc/squid/multimedia.files.acl”

Now create the the file
# vi /etc/squid/multimedia.files.acl
\.[Ee][Xx][Ee]$
\.[Aa][Vv][Ii]$
\.[Mm][Pp][Gg]$
\.[Mm][Pp][Ee][Gg]$
\.[Mm][Pp]3$

Save and close the file and Restart Squid:
# /etc/init.d/squid restart

Friday 27 July 2012

HowTo Clean and Re-build Squid cache

First, Check you squid.conf file
and locate the location of you cache directory, you should have line starting with "cache_dir"

1) Shutdown your squid server
squid -k shutdown

2) Remove the cache directory
rm -r /squid/cache/*

3) Re-Create the squid cache directory
squid -z

4) Start the squid

Tuesday 24 July 2012

squid configuration : ACL's based on MAC address

There are many times that client are having dynamic ip address (assigned by DHCP server) and in this cases it's hard to set any rules on bases of ip address as, you would not know what ip address the client machine be getting, in such case we could use mac based ACL's to set up any rules on that particular machine.

 # vi /etc/squid/squid.conf 

Look for acl section and append ACL as follows:
acl mac1 arp 00:11:22:70:44:90 
acl mac2 arp 00:11:22:33:44:55 
http_access allow mac1 
http_access allow mac2 
http_access deny all 

Save and close the file.

Restart squid server:
# /etc/init.d/squid restart

Monday 23 July 2012

Squid Password Authentication Using NCSA

You can configure Squid to prompt users for a username and password. Squid comes with a program called ncsa_auth that reads any NCSA-compliant encrypted password file.

1) Create the password file. The name of the password file should be /etc/squid/squid_passwd, and you need to make sure that it’s universally readable.

# touch /etc/squid/squid_passwd
# chmod o+r /etc/squid/squid_passwd

2) Use the htpasswd program to add users to the password file. You can add users at anytime without having to restart Squid. In this case, you add a username called nikesh:

# htpasswd /etc/squid/squid_passwd nikeshNew
password:Re-type new password:
Adding password for user nikesh

3) Find your ncsa_auth file using the locate/find command. (different distro stores this file at different locations)

# locate ncsa_auth/usr/lib/squid/ncsa_auth

4) Edit squid.conf; specifically, you need to define the authentication program in squid.conf, which is in this case ncsa_auth. Next, create an ACL named ncsa_users with the REQUIRED keyword that forces Squid to use the NCSA auth_param method you defined previously. Finally, create an http_access entry that allows traffic that matches the ncsa_users ACL entry. Here’s a simple user authentication example; the order of the statements is important:

## Add this to the auth_param section of squid.conf

auth_param basic program /usr/lib/squid/ncsa_auth /etc/squid/squid_passwd

# Add this to the bottom of the ACL section of squid.conf
acl ncsa_users proxy_auth REQUIRED

# Add this at the top of the http_access section of squid.conf
http_access allow ncsa_users

Remember to restart Squid for the changes to take effect.

Sunday 22 July 2012

cachemgr (Cache Manager) configuration for Squid

The cache manager (cachemgr.cgi) is a CGI utility comes with squid for displaying statistics about the squid process as it runs. The cache manager is a convenient way to manage the cache and view statistics without logging into the server

To make this configuration you need a webserver (Apache) running and configured.

1) Try to locate your cachemgr.cgi file which comes with the squid package, this can be done using rpm -ql command (different distro stores this file at different location), here you can also use locate/find command.

# rpm -ql squid | grep cachemgr.cgi
/usr/share/doc/packages/squid/scripts/cachemgr.cgi
/usr/share/man/man8/cachemgr.cgi.8.gz

In this case my cachemgr.cgi is in /usr/share/doc/packages/squid/scripts/ directory

2) Copy cachemgr.cgi file to your configure script alias (/var/www/cgi-bin) directory of you Apache

3) Open squid.conf file and insert following two parameters at the end of the file

cache_mgr nikesh@domain.com
cachemgr_passwd your_Password all

4) Restart your squid and open your browser and type
http://localhost/cgi-bin/cachemgr.cgi
you should see something like … , provide a configure e-mail and password (mentioned above)

Saturday 21 July 2012

Squid Password Authentication Using PAM

We’ll be using the pam_auth module. This will allow anyone who has a shell account to also be able to use the Squid server. 

Search for the auth_param section in the config and add these lines:
auth_param basic program /usr/lib/squid/pam_auth
auth_param basic children 5
auth_param basic realm Squid proxy-caching web server
auth_param basic credentialsttl 2 hours

Next search for this line and uncomment it:
acl password proxy_auth REQUIRED

Now create a pam module called /etc/pam.d/squid that contains:
auth required /lib/security/pam_unix.so
account required /lib/security/pam_unix.so

Restart the squid and you are done.

Friday 20 July 2012

Configure Squid to use other Proxy (cache)

If you want Squid to be part of a hierarchy of proxies or want Squid to fetch content from another proxy
cache_peer proxy.isp.com parent 8080 0 no-query no-digest ever_direct allow all

For Multiple parent
cache_peer proxy.isp1.com parent 8080 0 no-query no-digest default
cache_peer proxy.isp2.com parent 8080 0 no-query no-digest


Multiple parents with weight:
cache_peer proxy.isp1.com parent 8080 0 no-query no-digest weight=1 
cache_peer proxy.isp2.com parent 8080 0 no-query no-digest weight=2


Multiple parents with round-robin:
cache_peer proxy.isp1.com parent 8080 round-robin no-query
cache_peer proxy.isp2.com parent 8080 round-robin no-query
cache_peer proxy.isp3.com parent 8080 round-robin no-query

In above examples proxy.isp1.com, proxy.isp2.com and proxy.isp2.com are other cache servers

Thursday 19 July 2012

HowTo do Transparent proxy with Squid

Modify or add following to squid configuration file (/etc/squid/squid.conf):

httpd_accel_host virtual
httpd_accel_port 80
httpd_accel_with_proxy on
httpd_accel_uses_host_header on
acl lan src 192.168.1.1 192.168.2.0/24
http_access allow localhost
http_access allow lan

Added following rules to forward all http requests (coming to port 80) to the Squid server port 3128 :

[eth0 connected to internet and eth1 connected to local lan]

iptables -t nat -A PREROUTING -i eth1 -p tcp –-dport 80 -j DNAT –to 192.168.1.1:3128
iptables -t nat -A PREROUTING -i eth0 -p tcp –-dport 80 -j REDIRECT –-to-port 3128

Wednesday 18 July 2012

Forward Squid traffic to secure tunnel (SSH)

When Squid is installed and running, it uses port 3128 by default. 
You should test it manually by setting your HTTP proxy to the server that runs Squid. 
For instance, in Firefox to go Tools -> Options -> Advanced -> Network -> Settings and enter the IP address or host of the Squid proxy (e.g. 192.168.0.100) and 3128 for the port. 
Try to load any web page. If you see an access denied error, check out the http_access configuration in the squid configuration file.

Once Squid is all set and ready to go, you need to forward your connection to it over SSH. 
 
To set the tunnel up on your Windows 
download Plink, a command-line version of Putty SSH client, 
and run this command:

plink.exe -batch -N -l UserName -pw Password -L 3128:localhost:3128 SSH_Server

On Unix-based systems, simply run this command:

ssh -L 3128:localhost:3128 SSH_Server -f -N

Finally, tell your browser to use the SSH tunnel as a proxy. Basically you need to change the host to localhost and the port number to 3128 (See below).

Tuesday 17 July 2012

Setting up squid proxy server on Ubuntu

Install Squid
Open up the terminal and type the following command to install squid:
sudo apt-get install squid

Squid Configuration
Open the squid.conf file for editing using command:
gksudo gedit /etc/squid/squid.conf

Find the http_port tag, By default it reads
# http_port 3128

This is the default port that Squid will listen on for requests. If you want to change it, uncomment the line and set the correct port. If you want Squid to listen only on one specific NIC, you can also change the IP address – for example : 192.168.1.5:3128

Next, find the http_access section Uncomment these 2 lines:
acl our_networks src 192.168.1.0/24 192.168.2.0/24
http_access allow our_networks

NOTE: You'll need to change 192.168.1.0/24 to match your network. Unless you have a second subnet you can delete 192.168.2.0/24

With above change, the basic squid configuration is done, you can now start/stop the squid server using command: sudo /etc/init.d/squid start|restart|stop

Configuring squid Clients
To configure any application including a web browser to use squid, modify the proxy setting with the IP address of the squid server and the port number that you have specified in the squid configuration file 
(default 3128).

Below example showing the Firefox configuration for using squid proxy server running on ip address 192.168.1.2 and port 3128.


Sunday 15 July 2012

How to mount samba share on Linux client

Samba can be used to allow connectivity between Linux and Windows. Samba can be used to share printers, share directories, connect to an windows domain, and many other useful features.

In order to mount your samba share to your Linux client open up the /etc/fstab file and insert the following line into this file

//172.19.12.137/Music /mnt/samba cifs credentials=/etc/accessfile 0 0

Now create a new file: /etc/accessfile with following contents
username=Suhail
password=some_password
Save the above file and restart your Linux client (or type command mount -a),
after restart you should now able to access the share content from the samba server
under /mnt/samba directory.

This is preferred over having passwords in plaintext in a shared file, such as /etc/fstab. Be sure to protect any credentials file properly and also note that there should not be any extra space in this file.

It there are any space in this credentials file you might get the following error on trying to mount the file system
mount error(13): Permission denied
Refer to the mount.cifs(8) manual page (e.g.man mount.cifs)

Saturday 14 July 2012

How to Convert smbpasswd to tdbsam on Samba

The latest release of Samba offers many new features including new password database backends not previously available. Samba version 3.0.0 fully supports all databases used in previous versions of Samba. However, although supported, many backends may not be suitable for production use.

The tdbsam backend provides an ideal database back-end for local servers, servers that do not need built-in database replication, and servers that do not require the scalability or complexity of LDAP. The tdbsam back-end includes all of the smbpasswd database information as well as the previously-excluded SAM information. The inclusion of the extended SAM data allows Samba to implement the same account and system access controls as seen with Windows NT/2000/2003-based systems.

The tdbsam backend is recommended for 250 users at most. Larger organizations should require Active Directory or LDAP integration due to scalability and possible network infrastructure concerns.

Convert smbpasswd to tdbsam: enter as root on the command line:
      pdbedit -i smbpasswd:/etc/samba/smbpasswd -e tdbsam:/etc/samba/passdb.tdb
      And ensure the global section of smb.conf has such an entry:
      passdb backend = tdbsam

Friday 13 July 2012

Creating Recycle Bin for Samba storage

Samba is mainly used to share the files between Linux and windows and many times it happens that user deletes the file from the samba server and later wants to get back deleted files which is not possible with the default configuration of samba server.

The best option is to have a "Recycle bin" for every users on the samba server.
Here is an example of modifying the home directories of your users in samba configuration file
[homes]
comment = Home Directory
valid users = %S
browsable = no
guest ok = no
read only = no
vfs object = recycle
recycle:repository = RecycleBin
recycle:keeptree = yes
recycle:exclude = *.tmp, *.bak
The “vfs object” line calls in the plug-in that enables recycle bin capability.  On the other lines, you’re setting the name of the recycle bin directory, telling Samba to preserve the whole structure of any directories that a user may delete, and finally, telling it to not keep certain types of files.

Thursday 12 July 2012

Transfer Linux user to Samba users

To configure Samba on your Red Hat Linux system to use encrypted passwords, follow these steps:

1. Create a separate password file for Samba. To create one based on your existing /etc/passwd file, at a shell prompt, type the following command:

# cat /etc/passwd | mksmbpasswd.sh > /etc/samba/smbpasswd

If the system uses NIS, type the following command:

# ypcat passwd | mksmbpasswd.sh > /etc/samba/smbpasswd

The mksmbpasswd.sh script is installed in your /usr/bin directory with the samba package.

2. Change the permissions of the Samba password file so that only root has read and write permissions:

# chmod 600 /etc/samba/smbpasswd

3. The script does not copy user passwords to the new file, and a Samba user account is not active until a password is set for it. For higher security, it is recommended that the user's Samba password be different from the user's Red Hat Linux password. To set each Samba user's password, use the following command (replace username with each user's username):

# smbpasswd username

4. Encrypted passwords must be enabled in the Samba configuration file. In the file smb.conf, verify that the following lines are not commented out:

encrypt passwords = yes
smb passwd file = /etc/samba/smbpasswd

5. Make sure the smb service is started by typing the command service smb restart at a shell prompt.

Wednesday 11 July 2012

Sync users' Samba passwords with their system passwords

The pam_smbpass PAM module can be used to sync users' Samba passwords with their system passwords when the passwd command is used. 
If a user invokes the passwd command, the password the uses to log in to the system as well as the password he must provide to connect to a Samba share are changed.

To enable this feature, add the following line to /etc/pam.d/system-auth 
below the pam_cracklib.so invocation:

password required /lib/security/pam_smbpass.so nullok use_authtok try_first_pass

Tuesday 10 July 2012

Sync Samba and Unix password

The pam_smbpass PAM module can be used to sync users’ Samba passwords with their system passwords. 
If a user invokes the passwd command, the password he uses to log in to the system as well as the password he must provide to connect to a Samba share are changed.

To enable this feature, 
add the following line to /etc/pam.d/system-auth below the pam_cracklib.so invocation:


password required /lib/security/pam_smbpass.so nullok use_authtok try_first_pass

Monday 9 July 2012

Samba Server As Primary Domain Controller

Server
a.Operating System :- Fedora-15
b.Samba Server :- Samba version 3.0.23c-2 (included in Fedora Dvd)

Computer Name:-server 
Comment :- Domain Controller
Domain Name :- rizvi.com
Domain admin Name :- root
Ip Address :- 192.168.0.10


Client
a.Operating System :- Windows Xp Sp2

Computer Name :- wxp
Domain Name :-     rizvi.com
Ip Address :- 192.168.0.20

Configuration

Server
1.  

vi /etc/hosts

# Do not remove the following line, or various programs
# that require network functionality will fail.
127.0.0.1       localhost.localdomain    localhost
192.168.0.10    server


2.

vi /etc/sysconfig/network

NETWORKING=yes
HOSTNAME=server


3.

vi /etc/sysconfig/network-scripts/ifcfg-eth0

# Advanced Micro Devices [AMD] 79c970 [PCnet32 LANCE]
DEVICE=eth0
BOOTPROTO=static
BROADCAST=192.168.0.255
HWADDR=00:0C:29:9E:C2:10
IPADDR=192.168.0.10
NETMASK=255.255.255.0
NETWORK=192.168.0.0
ONBOOT=yes

4.

vi /etc/samba/smb.conf


[global]
workgroup = rizvi.com
netbios name = Server
server string = 

security = user
encrypt passwords = yes


domain logons = yes


local master =yes
os level = 65
preferred master = yes


domain master = yes

wins support = yes

[homes]
   comment = Home Directories
   browseable = no
   writeable = yes


5.
add a group for Clents in /etc/group by typing:-
 groupadd -r DomainClientComputers

Register in that group Machine name to be join  in /etc/passwd by typing:-
 useradd -r -g DomainClientComputers -d /dev/null -s /dev/null vxp$

Add Machine Nane in /etc/samba/smbpasswd
 smbpasswd -a -m vxp

6.
Add root as a domain admin purpose in  /etc/samba/smbpasswd
smbpasswd -a root


7.

adduser sohail

Add sohail as a client user in /etc/samba/smbpasswd
smbpasswd -a sohail

8.
service smb restart

9.
chkconfig smb on

Sunday 8 July 2012

Mount Samba share using fstab

To mount a Samba share when Linux system comes up after reboot

edit the /etc/fstab file and put entry as follows for your Windows/Samba share:

//ntserver/share /mnt/samba smbfs username=username,password=password 0 0


For example,
if you want to mount a share called //ntserver/docs then you need to write following entry in /etc/fstab file:

//192.168.0.1/share /mnt/samba smbfs username=sohail,password=passwd123 0 0

Saturday 7 July 2012

Using Samba As File Server in Linux with guest(Anonymous) login and read-write access


1. Create a folder for share purpose
    mkdir sharedrive

2.Give full access to that folder
   chmod 777 sharedrive

3.Edit smb conf file
 vi /etc/samba/smb.conf

[global]
# workgroup = NT-Domain-Name or Workgroup-Name
   workgroup = WORKGROUP
                                                                               
# server string is the equivalent of the NT Description
   server string = Samba Server
                                                                            
map to guest = bad user
                                                                              
encrypt passwords = yes
lanman auth = Yes
                                                                               
[Guest Share]
       comment = Guest access share
       path = /sharedrive
       guest ok = yes
       writeable = yes
       create mask = 777

4.Test smb.conf file
 testparm

5.Restart the service
service smb restart

6.chkconfig smb on

Friday 6 July 2012

Setting Hostname(Computer Name) in Linux (RedHat)

Edit the following files with vi


1.
           /etc/hosts

# Do not remove the following line, or various programs
# that require network functionality will fail.
127.0.0.1    localhost.localdomain localhost
192.168.0.20    sohail.bom.labs.net

2.

          /etc/sysconfig/network

NETWORKING=yes
HOSTNAME=sohail.bom.labs.net

Thursday 5 July 2012

Configure ipaddress in linux

1.edit the file with vi

vi/etc/sysconfig/network-scripts/ifcfg-eth0

DEVICE=eth0
ONBOOT=yes
BOOTPROTO=static
IPADDR=192.168.0.20
NETMASK=255.255.255.0
GATEWAY=192.168.0.1


2.To put Dns Server ip address
vi /etc/resolv.conf
nameserver=192.168.0.10

3.restart the network service
service network restart

Wednesday 4 July 2012

How to install Linux / UNIX *.tar.gz tarball files

Tarballs are a group of files in one file. Tarball files have the extension .tar.gz, .tgz or .tar.bz2. Most open source software use tarballs to distribute programs/source codes.

# 1: Uncompress tarball

To uncompress them, execute the following command(s) depending on the extension:
$ tar zxf file.tar.gz
$ tar zxf file.tgz
$ tar jxf file.tar.bz2
$ tar jxf file.tbz2

Now change directory
$ ls
$ cd path-to-software/

# 2: Build and install software

Generally you need to type 3 commands as follows for building and compiling software:
# ./configure
# make
# make install
Where,
  • ./configure will configure the software to ensure your system has the necessary functionality and libraries to successfully compile the package
  • make will compile all the source files into executable binaries.
  • Finally, make install will install the binaries and any supporting files into the appropriate locations.

# 3: Read INSTALL / README file

Each tarball comes with installation and build instructions. Open INSTALL or README file for more information:
$ vi INSTALL

Tuesday 3 July 2012

How to replay YouTube video automatically

In the address bar, add the word "infinite" before the word "youtube".
This is the easiest way to put Youtube videos on loop.
When you are finished your address bar should be changed from:

Code:
http://www.youtube.com/watch?v=MrMNHwmd9Hc
To
Code:
http://www.infiniteyoutube.com/watch?v=MrMNHwmd9Hc

Monday 2 July 2012

How to make an OS X Lion USB thumb drive

Here are three different ways to put Lion on a USB thumb drive. If you buy and install Lion from the App Store  it downloads all 3Gigabytes from the App Store, installs Lion, then deletes the installer!  So when you go to install it on another machine it needs another 3Gigabyte download! Here’s how to make a re-usable installer.
Option 1: Put a full bootable Lion installation on the USB Drive with a recovery partition.
What you need: an 8G thumb drive and OS X Lion from the App Store.
What you get: A USB stick you can boot off and repair your Lion installation from.
Download the Lion installer from Apple App Store. DO NOT INSTALL IT ONTO YOUR COMPUTER OR THE INSTALLER WILL DELETE ITSELF. MAKE A COPY OF THE INSTALLER.  If you have already installed it and it has deleted itself,  go back into the App store and click on ‘purchases’ and next to Lion it will say ‘Installed’. Now option-click on ‘purchases’ and ‘installed’ will change to ‘install’ so that you can re-download the installer.
Format your Thumbdrive using a GUID Partition Table, and ‘ Mac OS Extended (Journaled)’, then you can run the Lion installer and install Lion onto the thumb drive.
Option 2: Create a Lion Recovery Disk.
You’ll only need a 4G USB Drive for this option.

Sunday 1 July 2012

How to Air Print to ANY printer from your iPod, iPad or iPhone

Apple has introduced a ‘print’ button onto iPads, iPhones and iPods to allow you to print directly to a printer from your iOS device. Unfortunately  you need a special AirPrint enabled printer. Thankfully there is a free application called ‘AirPrint Activator’ that allows you to print to any printer, here’s where to get it and how to use it.
AIRPRINT
On your iPhone at the bottom of some apps is a ‘share’ button. If you click this button you get a menu of different ways to share the content, one of these options is ‘print’ as shown below.
Share Button

Saturday 30 June 2012

Turbocache in XP

First, install your video drivers. You've probably already done this, but if you want to make sure that you have something recent, do the following:
-Right-click your desktop and click Properties
-Go to the Settings tab
-Click the advanced button
-Go to the Adapter tab (note the Memory Size under Adapter Information)
-Click on Properties button
-Go to the Driver tab
-Check the Driver Date and Driver Version to see if it's at least November 2006 and/or 93.71
-Close the dialogs.
-If your version isn't up-to-date, then download and install the latest nVidia Driver.

Install Rivatuner
-Just download it from here: http://downloads.guru3d.com/download.php?det=163
-Run the installer

Friday 29 June 2012

iPhone Error 21 and Solution

iPhones can give you many errors. And, if you are downgrading your iPhone then you might have encountered Error 21. So, do you get this Error 21 frequently?
iPhone Error 21


If yes, then the problem is, instead of landing in Device Firmware Upgrade (DFU) mode you are ending up in Recovery mode.
Now, if you can get back to DFU mode that will solve your problem. Once the iPhone is in (DFU) mode, you can follow the following process to downgrade your iPhone.

Procedure

When the iPhone is in DFU mode, this mode will bypass the operating system that is currently installed. This process aids in downgrading or upgrading your Operating System in iPhone. Remember, DFU mode is different from the usual Recovery mode.

Thursday 28 June 2012

How To Reinstall Internet Explorer

1. Insert the Win XP CD

2.
Open Start / Run and type:


rundll32.exe setupapi,InstallHinfSection DefaultInstall 132 c:\windows\inf\ie.inf

Press ENTER

Wednesday 27 June 2012

Speed up IE7 ( Internet Exlporer 7 )

Now there comes a time in a man life when you have to choose which browser you’re going to use. But for me I picked both, sometimes I want to see whats on the other side. Now Looking for tweaks For IE7 can be a little difficult because almost all articles about tweaking IE7 are all automated and you have to install a third party tweaking software which I don’t like. so what else could do, but to fire up my Registry Editor.
Now We can speed up IE7 page loading especially on multiple tabs and look for this key
[HKEY_CURRENT_USER\Software\Microsoft\Windows\CurrentVersion\Internet Settings]
“MaxConnectionsPerServer”=  Changedit to dword:00000010
“MaxConnectionsPer1_0Server”=Changed it to dword:0000010

Since I rarely use IE7… so Its a bit rusty when i opened it to try it for the first time.. but after closing and restart IE a noticed a difference and ohhh yeahh.. it’s goodboom you’re done.. Exit regedit restart your PC and enjoy the fast loading of pages.

Tuesday 26 June 2012

Windows uses 20% of your bandwidth Here's how to Get it back

A nice little tweak for XP. Microsoft reserve 20% of your available bandwidth for their own purposes (suspect for updates and interrogating your machine etc..)

Here's how to get it back:

Click Start-->Run-->type "gpedit.msc" without the "

This opens the  group policy  editor. Then go to:


Local Computer Policy-->Computer Configuration-->Administrative Templates-->Network-->QOS Packet Scheduler-->Limit Reservable Bandwidth


Double click on Limit Reservable bandwidth. It will say it is not configured, but the truth is under the 'Explain' tab :

"By default, the Packet Scheduler limits the system to 20 percent of the bandwidth of a connection, but you can use this setting to override the default."

So the trick is to ENABLE reservable bandwidth, then set it to ZERO.

This will allow the system to reserve nothing, rather than the default 20%.

I have tested on XP Pro, and 2000

Monday 25 June 2012

How to create a disk image of a DVD or CD using the terminal


This is a little bit advanced, but useful.
1. Insert the DVD/CD into your drive.
2. Run the TERMINAL application (In your Appplications Utilities Folder)
You will get a little window with a prompt something this: Macintosh:~ wayne$
3.Type the following and then hit return:
drutil status
It will give you some info like this:
Vendor Product Rev
SONY DVD RW DW-U21A AADB
Type: DVD-R Name: /dev/disk2
Cur Write: 4x DVD Sessions: 1
Max Write: 4x DVD Tracks: 1
This is information about your DVD/CD drive and the important thing to notice is the name, it will be /dev/disk1 or /dev/disk2

Sunday 24 June 2012

How to turn on automatic logon in Windows XP

Method 1:
You can use Registry Editor to add your log on information. To do this, follow these steps:
  1. Click Start, click Run, type regedit, and then click OK.
  2. Locate the following registry key:
    HKEY_LOCAL_MACHINE\SOFTWARE\Microsoft\Windows NT\CurrentVersion\Winlogon
  3. Using your account name and password, double-click the DefaultUserName entry, type your user name, and then click OK.
  4. Double-click the DefaultPassword entry, type your password under the value data box, and then click OK.

    If there is no DefaultPassword value, create the value. To do this, follow these steps:
    1. In Registry Editor, click Edit, click New, and then click String Value.
    2. Type DefaultPassword as the value name, and then press ENTER.
    3. Double-click the newly created key, and then type your password in the Value Data box.
    Note: If the DefaultPassword registry entry does not exist, Windows XP automatically changes the value of the AutoAdminLogonregistry key from 1 (true) to 0 (false) to turn

Saturday 23 June 2012

How to connect your iPhone or iPod to your home stereo.


To connect your iPhone, iPad or iPod to your home stereo you just need a 3.5mm to RCA cable like this cable here. The RCA cable plugs into the rear of your stereo and the 3.5mm plugs into your iPhone headphone jack.
When plugging into the back of the Stereo Amplifier, you can use almost whatever inout you want: CD-INPUT, TAPE-IN, TV-IN, DVD-IN or the AUX-IN,  but do not use the PHONO-IN as it is designed specifically for a record player and won’t sound as good.
For the best results set your iPhone volume to about half. If it’s too quiet you may get noise and hiss. If it’s too loud you may get some distortion.
You can have the USB charger plugged into the iPod at the same time.
If you want you can use an Apple iPod dock, and leave the audio and charger cable plugged into the dock permanently. The dock has a line out so that it doesn’t matter what volume the iPod is set to, and it will also charge your iPod, and has a remote control.


If you are buying a new Stereo, Pioneer and others are now including AIRPLAY into some of their amplifiers. The amplifiers have a Wi-Fi receiver built in which means you can play from your iOS device over your Wi-Fi (Airport) network directly to your Stereo with no loss of quality. You don’t need to connect any cables.

Friday 22 June 2012

Lock User Accounts After Too Many Login Failures

Add the following two lines highlighted in blue to the /etc/pam.d/system-auth file as shown below:
 
auth        required      /lib/security/$ISA/pam_env.so
auth        required      /lib/security/$ISA/pam_tally.so
                           onerr=fail no_magic_root
auth        sufficient    /lib/security/$ISA/pam_unix.so likeauth
                           nullok
auth        required      /lib/security/$ISA/pam_deny.so
account     required      /lib/security/$ISA/pam_unix.so
account     required      /lib/security/$ISA/pam_tally.so 
                           per_user deny=5 no_magic_root reset
account     sufficient    /lib/security/$ISA/pam_succeed_if.so uid
                           < 100 quiet
account     required      /lib/security/$ISA/pam_permit.so
password    requisite     /lib/security/$ISA/pam_cracklib.so retry=3
password    sufficient    /lib/security/$ISA/pam_unix.so nullok
                           use_authtok md5 shadow
password    required      /lib/security/$ISA/pam_deny.so
session     required      /lib/security/$ISA/pam_limits.so
session     required      /lib/security/$ISA/pam_unix.so


The first added line counts failed login and failed su attempts for each user. 
The default location for attempted accesses is recorded in /var/log/faillog.

Thursday 21 June 2012

Web Interface Logon process in Citrix

Web Interface(WI) logon process:

1. User enter URL of WI server and logs on.
2. Web Interface server contacts XML broker, xml broker authenticates user and returns application list
3. User clicks on application
4. Web Interface server contacts XML broker
5. XML broker contacts ZDC to find least loaded server,
6. ZDC returns IP of least loaded server to XML broker
7. XML broker returns IP address of least loaded server to Web Interface
8. Web Interface creates ICA file with IP of least loaded server and returns it to client
9. Browser launches ICA client and connects directly to server using ICA files sent from Web Interface

Wednesday 20 June 2012

Adding Second Farm to web Interface

Open the first farm and:

Open the Access Management Console at Web Interface Server,
click “Configuration Tool” 
-> “Web Interface” 
--> right click on the site you created 
and select “Manage Server Farm” 
-> Add second Farm

Tuesday 19 June 2012

Backup Access Data Store and Restore

While there is no built-in backup scheduler with Access, Presentation Server includes the DSMAINT BACKUP command for backing up Access Data Stores only. Citrix recommends that this command be executed daily using a scheduler script.
WARNING!
Do not attempt to backup Microsoft SQL Server or Oracle databases using this command.
MDB: A file with the MDB file extension is a Microsoft Access Database file.
Moving / Restoring an Access Database
Access to a valid backup or Copy of the Data Store is assumed before the following procedure is started.
Moving an Access Database
To move an Access database, complete the following procedure:

  1. Copy the Data Store file named “MF20.mdb” in the %system%\Program Files\Citrix\Independent Management Architecture\ folder from the source server to the target server, which will be the new Data Store host.

Monday 18 June 2012

3 Ways to Access Your Linux Partitions From Windows

image
If you’re dual-booting Windows and Linux, you’ll probably want to access files on your Linux system from Windows at some point. Linux has built-in support for Windows NTFS partitions, but Windows can’t read Linux partitions without third-party software.
This list is focused on applications that support the Ext4 file system, which most new Linux distributions use by default. These applications all support Ext2 and Ext3, too – and one of them even supports ReiserFS.

Ext2Fsd

Ext2Fsd is a Windows file system driver for the Ext2, Ext3, and Ext4 file systems. It allows Windows to read Linux file systems natively, providing access to the file system via a drive letter that any program can access.
You can have Ext2Fsd launch at every boot or only open it when you need it. While you can theoretically enable support for writing to Linux partitions, I haven’t tested this. I’d be worried about this option, myself – a lot can go wrong. Read-only support is fine, though, and doesn’t have a risk of messing
Next previous home