Sunday 27 January 2013

Downgrade Forest Functional level or Domain Functional Level in Server 2012

Today i will share that How we can downgrade the Forest Functional level or Domain Functional level for server 2008 or 2012 .

It is there that revert to the lower FFL or DFL is not possible but in server 2008 and 2012 it is possible.
(FFL- forest functional level) (DFL- domain functional level)

Here in my scenario i have server 2012 with forest functional level and domain functional level "windows server 2012", as you can see below the FF.


dd
As you can see the FFL of the domain server12.com is "windows server 2012 released candidate"
and if you want to add ADC with server 2008 , it will not allow to do so and to add that you need to downgrade the FFL and DFL to 2008.

Now i will use the power shell Active directory module to do this activity.You need to run the following power shell command

Set-ADForestMode server12.com -ForestMode Windows2008Forest

It will ask you if you are sure to perform this task ,press Y as shown below


You can see in the above snapshot that the downgrade is done and even when you will see the the FFL level from the domains and trust it will show you the current FFL is windows server 2008.

Now you need to downgrade the DFL to server 2008.

Below you can see that the server12.com domain has DFL as windows server 2012 .


Now you can follow the same procedure to downgrade the DFL as shown below.You have to run the following command.

Set-ADDomainMode server12.com -DomainMode windows2008domain


Now you will see both of your FFL and DFL are now on Windows server 2008.

Monday 14 January 2013

How to Analyze Windows Memory Dump

Welcome back guys :)

Today here I am going to explain about how to analyze the memory dump.
As in my previous post I have describe to you: How to create memory dump and where you can find that dump file.
Let’s say you have configured a memory dump on a server and server got unexpected down with BSOD.

Now you need to go to the default location i.e. %SystemRoot%\Memory.dmp for the memory dump file.
You can find the memory.dmp as below.


This memory.dmp file is the dump file for complete dump. Now you need to analyze it ;)
There are bundle of software in the market for the same, some are free of cost and some are licensed.
Microsoft has tool that we can use to analyze the memory dump on Microsoft platforms called as windows debugger (dbg_x86_6.11.1.404). You can download it from here.

After downloading the debugger you need to do little bit configuration before analyzing the dump.


Now you need to configure the symbol path for it. Before doing it just do the following
  1.      Create a folder named “symbols” without quotes in the root drive.
  2.      Open the Windbg and then go to FileàSymbol file path.
  3.     Set the path to “SRV*c:\symbols*http://msdl.microsoft.com/download/symbols “without quotes.
Symbol Path:- Symbol files provide a footprint of the functions that are contained in executable files and dynamic-link libraries (DLLs).Additionally, symbol files can present a roadmap of the function calls that lead to the point of failure.
Now the configuration is done, now you need to open the dump file in the debugger.

Now you need to open dump file , To do this goto File-->Open Crash Dump


After you open the Memory.dmp, it will make some calculation and load the symbols as below.
Now you need to write the command "!analyze -v " to get the details

After this command you will get the details about the reason behind the Crash :)

The reason for the crash was fltmgr.sys file.

As you all are System Admins so you must have good google search skills,Now just google it and get the reason for the same.
I have found the reason and the there is some Hotfix from Microsoft for this error.

http://support.microsoft.com/kb/955087

This is How we can Analyze the dump.

Tuesday 8 January 2013

How to enable memory dump on a windows server

It is very often we see the blue screen on the Microsoft based OS.Basically we called this blue screen as 
Blue Screen Of Death (BSOD).


I have asked the question "what is BSOD" from many guys during the interviews but usually they replied
that it happened due to RAM or HDD failure, they simply reply that in this case they will replace either RAM or HDD to fix this issue on the server. 

So today i will give a idea about this BSOD and how to analyze this issue on windows platform.

->What is BSOD ?
->The Blue Screen of Death , displayed by the Microsoft Windows family of operating systems upon encountering a critical error,of a non-recoverable nature, that causes the system to crash.Stop errors are hardware or driver related, causing the computer to stop responding in order to prevent damage to the hardware or data.

->Type of memory dump ?
->There are three type of dumps created

1. Complete Memory Dump
2. Kernal Memory Dump
3. Small Memory Dump

1. Complete Memory Dump:-A Complete Memory Dump is the largest kernel-mode dump file. This file contains all the physical and virtual memory for the machine at the time of the fault.If you select the complete memory dump option, you must have a paging file on the boot volume The Complete Memory Dump file is written to %SystemRoot%\Memory.dmp by default.The Complete memory dump option is not available on computers that are running a 32-bit operating system and that having 2 gigabytes (GB) or more of RAM (by default).

2. Kernal Memory Dump:  A Kernel Memory Dump contains all the memory in use by the kernel at the time of the crash.The dump file will be around one-third the size of the physical memory on the system. This dump will not include unallocated memory or any memory allocated to applications. It only includes memory allocated to Windows kernel.The Kernel Memory Dump file is written to %SystemRoot%\Memory.dmp by (default)

3. Small Memory Dump:- A Small Memory Dump is much smaller than the other two crash dump files. It is exactly 64 KB in size (128KB on 64-bit systems) .This kind of dump file can be useful when space is greatly limited. However, it contains very less information for the reason of the crash.

                              How to enable memory dump on a windows server

Here i am going to configure the memory dump on Win-7/server 2008

1. Right click on my computer and click on properties then click on 2. Advance system setting option on left side ,then click on 3. Advance tab, Now click on 4. setting under Startup and recovery.Below are the screenshot


Same you can configure from the registery as well from the location as mentioned below

HKLM\System\CurrentControlSet\Control\CrashControl
All the things that you can configure via GUI can be configured via registery as well.
  • Write an event to the System Log checkbox = LogEvent
  • Automatically Restart checkbox = AutoReboot
  • Write Debugging Information drop-down = CrashDumpEnabled
  • Dump File text box = DumpFile
  • Overwrite any existing file checkbox = Overwrite 

                              How to Crash the server manually using keyboard

Now you have configured the memory dump on the server and now you can check as well if it is creating the memory dump file on the server or not.Also when you need to create memory dump file manually after a crash ,do the following to configure the same.

Using PS/2 keyboard :-


1. Start Registry Editor.
2. Locate the following registry subkey:

HKEY_LOCAL_MACHINE\SYSTEM\CurrentControlSet\Services\i8042prt\Parameters

3. On the Edit menu, click Add Value, and then add the following registry entry:

Name: CrashOnCtrlScroll
Data Type: REG_DWORD
Value: 1

4. Exit Registry Editor, and then restart the computer.


 Using USB keyboad:

1. Start Registry Editor.
2. Locate the following registry subkey:

HKEY_LOCAL_MACHINE\SYSTEM\CurrentControlSet\Services\kbdhid\Parameters

3. Make sure that the following registry entry is enabled:

Name: CrashOnCtrlScroll
Data Type: REG_DWORD
Value: 1

4. Exit Registry Editor.

If You can generate a system memory dump by holding down the right CTRL key and pressing the SCROLL LOCK key twice. (Ctrl+Scroll lock twice)

Note: Pressing left CTRL key does not generate the system memory dump.


Will come with new Blog shortly on How to Analyze the memory dump....... ;)

Wednesday 2 January 2013

Set Up Windows 2003 R2 NFS Server for VMware ESXi Backups

Generally my preference is to use Linux as an NFS server.  On the internet you will see frequent reference to the belief that NFS works better on Linux/UNIX.  Recently I decided to try and set up NFS services on Windows to see how well it would perform.  In this tutorial I will set up Services for UNIX 3.5 on a Windows 2003 R2 server and configure it using the User Name Mapping service to allow a VMware ESXi to use it as a datastore for VMs or backups via non-anonymous connections.
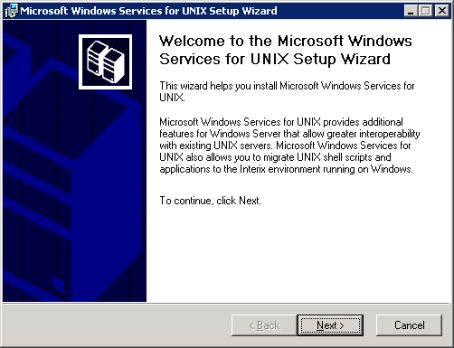
First off grab the Windows Services for UNIX (SFU) installation files here.  Extract the files from the download file and run the setup.
Click Next.
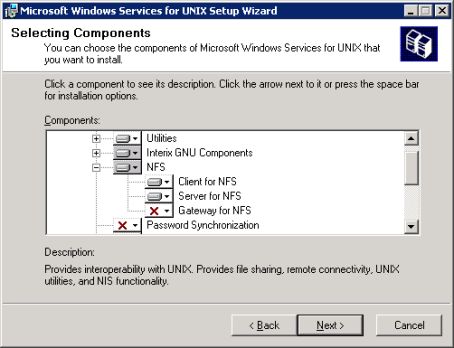
Select Custom Installation and click Next.
Under NFS select Client for NFS and Server for NFS for installation.  Although in the image I have not unselected them you can unselect all the other UNIX utilities.
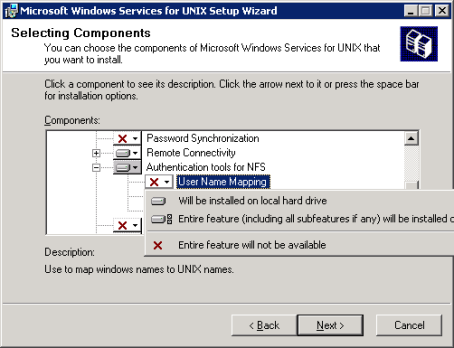
Scroll down and under Authentication tools for NFS select User Name Mapping to be installed.  Again this and Client/Server NFS should be the only three options that need to be installed.  Click Next.
Click Next.
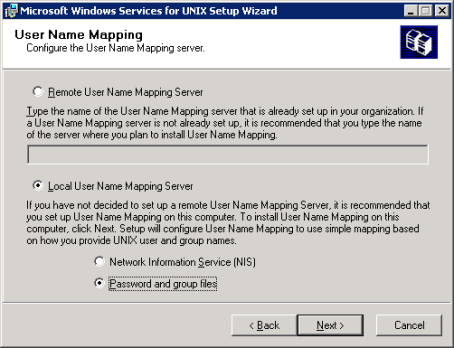
Select Local Mapping Server, and select Password and group files.  Click Next.
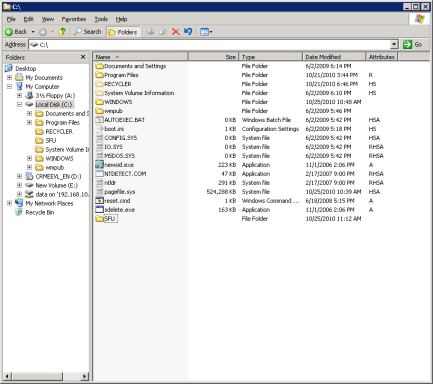
Now go to Windows Explorer and create a directory to store the password and group lists from the VMware ESXi host.
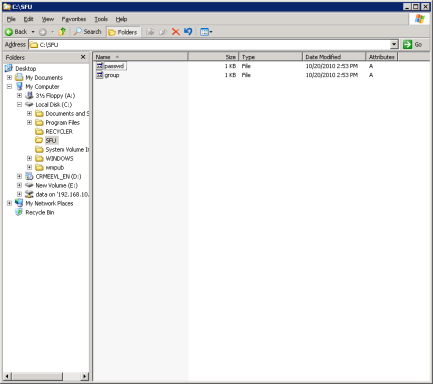
In this example I will create a directory C:\SFU for the password/group files.  Unfortunately SFU will install the program files into this directory and will delete the password/group files, so after the install is completed you’ll need to recopy the files here.  They do need to be placed here initially so the installer will find them.  Or obviously you could use a different directory for the password/group files.


Enter the path for the password and group list files, click Next.


Click Next.  Allow the install to complete.
Create User Name Mapping

Go to Start > Administrative Tools > Services for UNIX Administration.

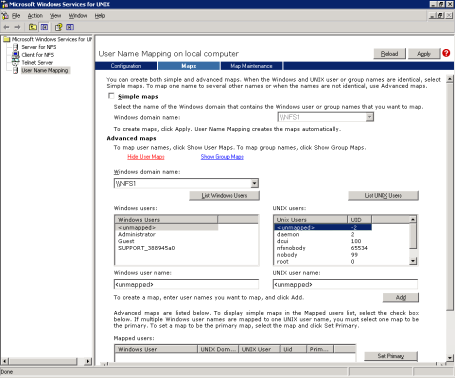
In the left pane go to User Name Mapping, then in the middle top click Maps.

Uncheck Simple maps.  Then under Advanced maps click Show User Maps.

Now click the List Windows Users and List UNIX Users buttons.

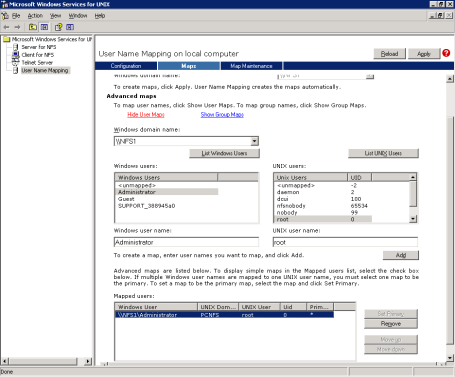
Select a Windows user and UNIX user to map each other to, I just mapped the UNIX/ESXi root user to Administrator.  Now click the Add button.

Click OK.

Click OK.

You will now see the new user mapping below.  Optionally you could create a group mapping as well, but I found that it isn’t necessary.
In the upper right click the Apply button.  Then close the window.


Now go out to a directory that you’d like to make available via NFS, right click it and select Properties.
Click the NFS Sharing tab in the dialog, then select Share this folder.  Now click the Permissions button.
Change the Type of access to Read-Write, and check Allow root access.  This is not the most secure setup, so you may want to limit what is available in this directory.  Click OK.
Click OK.
Now go into the Services MMC, we now need to restart the User Name Mapping service.
NFS requires a variety of network ports to be made available, so for now I will disable the Windows firewall.  Obviously this is not recommended for production environments.
Click Properties.
Click Advanced.
Click Settings.
Select Off, then click OK.
Connect VMware ESXi to NFS Datastore
Go into the vSphere Client.  Select the ESXi host, then in the main pane click Configuration, then under Hardware select Storage.
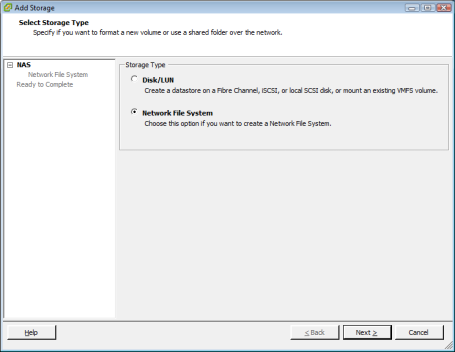
In the Datastore section click Add Storage.
Choose Network File System and click Next.
Enter the NFS server hostname/IP address, the name of the nfs folder share name with a preceding /, and a datastore name and click Next.
If all goes well the NFS share from Windows will now show up under datastores!  You now have a place for your virtual machine backups.  I have actually found that read/write performance from Linux and ESXi clients connecting to the Windows NFS server if very good.  Good luck!

Next previous home